Overview
Key Concepts
General
- Index
- Favorites
- User Getting Started
- General
- User Key Concepts
- Search
- User Testing and Debugging
- User Interface
Account
- Index
- Add a Group to an Organization
- Add a New Azure Cloud
- Add a New Cloud
- Add a User To a Group
- Add a User
- Add a User to a Team
- Azure Setup
- Azure
- Catalogs
- Clouds
- Cost Management
- Create a Team in an Organization
- Delete a Platform
- Deploy an Organization
- Deployment Approval Process
- Enable Access to an Assembly for a User on a Team
- Environment Profiles
- How Cost Tracking and Reporting Works
- Import and Export Catalog
- Account
- Manage OneOps User Accounts
- Notifications
- OneOps Policy Management
- Organization Summary
- Provide Only Necessary Privileges to Accounts
- Reports Summary
- Restrict Access with Teams
- Secrets Proxy
- Security Groups
- Shutdown a Cloud
- View a Reports Summary
- View, Add, or Edit Environment Profiles
- View an Organization Summary
- View Assembly and Organization Consumption with Reports
Design
- Index
- Add a Platform to a Design
- Add a Variable
- Add ELK Stack to an Application
- Add or Delete a Security Group to Open or Close an Additional Port
- Add a Team to an Assembly
- Apache HTTP Server Component
- Apache HTTP Server Pack
- Apache Tomcat Pack
- Artifact Component
- Attachments
- Variables Override Prevention
- Certificate Component
- Chocolatey Package Component
- Components
- Compute Component
- Create Assemblies to Design Applications
- Create Environment Dependency with Environment Profiles
- Daemon Component
- Design Best Practices
- Download Component
- Edit a Platform
- Enable https for a Service (LB Certs)
- File Component
- Filebeat Component
- Firewall Component
- Fully Qualified Domain Name FQDN
- Hostname Component
- Design
- Java Component
- Job Component
- Keystore Component
- Load Balancer Component
- Library Component
- Load/Extract
- Logstash Component
- Manage Assemblies
- DotNet Framework Component
- Microsoft IIS Pack
- IIS Website Component
- Microsoft SQL Server Pack
- Naming Conventions
- NuGet Package Component
- Objectstore Component
- Operating System Component
- Packs
- Platform Links
- Platforms
- Ports by Platform
- Propagation
- Security Group Component
- Secrets Client Component
- Sensuclient Component
- Set Up Multiple Ports/Protocols in Load Balancer
- Share Component
- SSH Keys Component
- Storage Component
- Telegraf Component
- Upgrade an Application Version in an Environment
- User Component
- Variables
- View Design Releases
- Volume Component
- Watching an Assembly
- Website Component
Transition
- Index
- Add CNAME in Azure DNS
- Add CNAME
- Add or Edit Primary and Secondary Clouds
- Add or Reduce Capacity
- Availability Modes
- Configure ECV Check URL on OneOps
- Create an Environment
- Delete an Environment
- Deploy Application after Design Changes
- Deploy an Application for the First Time
- Deploy Application With Database
- Deploy an Environment
- Deploy Multiple Clouds in Parallel
- Deploy and Provision an Application and Environment for the First Time
- Edit an Environment
- Email Notification Relay
- Environment Releases
- Environment
- Transition
- Remove an Unused Cloud from an Environment
- Rollback Code
- Set Variable Cloud Scaling Percentage
- Transition Best Practices
- Transition
- View Deployment Status
Operation
- Index
- Assess the Health of Applications, Platforms and Clouds
- Auto Repair
- Auto Replace
- Auto Scale
- Computes in Operation
- Control Environment
- Enable Platform to Auto Replace Unhealthy Components
- Ensure that Alerts for Production Environment are Sent to NOC
- Find a Platform VIP Name
- Grep or Search Text in Files on Computes
- Operation
- Navigation to Monitors
- Monitors
- Operations
- Operations Summary
- Set Up a Custom Action
- Take a Node out of Traffic (ECV Disable)
- Update or Upgrade New OneOps Code
Home > user > transition > Create an Environment
Create an Environment
An Environment captures your operational requirements for an instance of your Assembly. Examples of Environments are dev, qa, or prod environments. Because all environments use the same base application model, the overall effort to maintain all of the environments is minimized.
Solution
To create an environment, follow these steps:
- Go to the assembly.
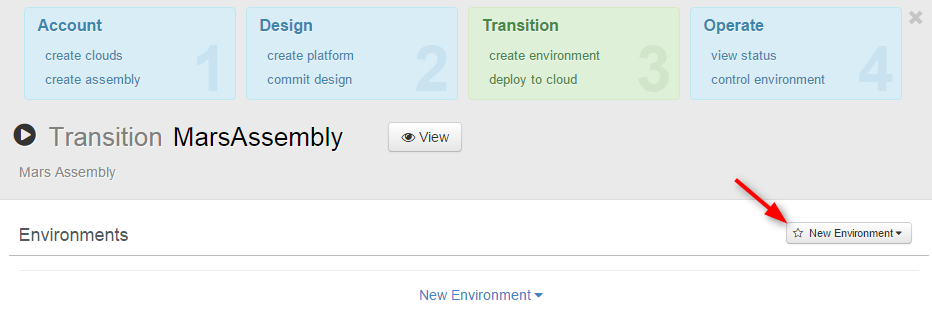
- In the Transition phase, click create environment.
- Select the appropriate environment profile
-
Click New Environment.

-
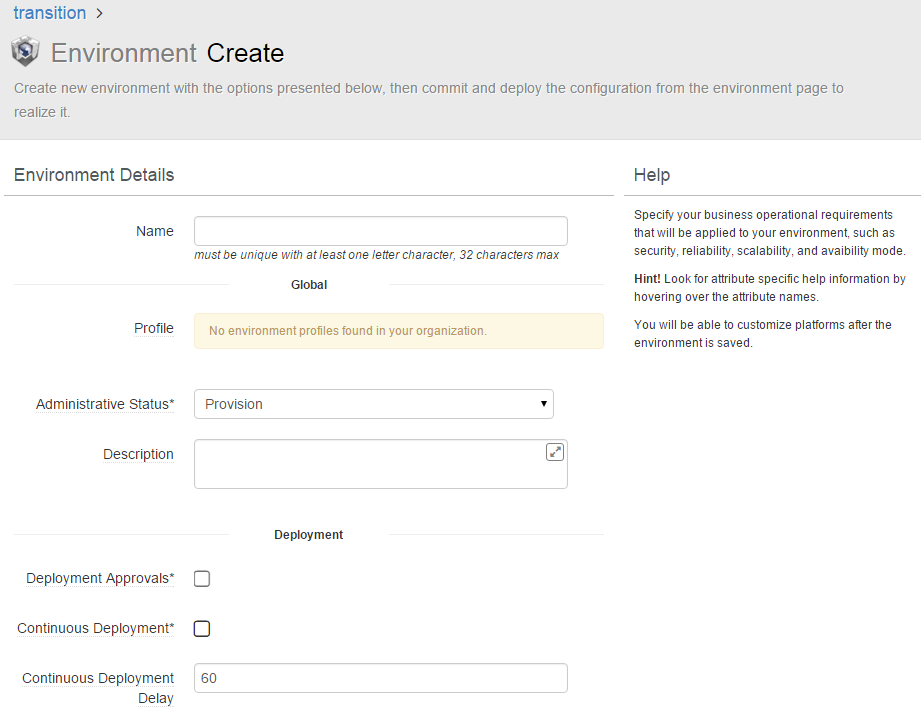
Enter the properties for the new environment.

- Include the following:
- Environment name that is unique to your Assembly
- Description
- Administrative Status from the options listed below.
- Provision: Environment is under provisioning state
- Active: Environment is up and serving production traffic
- Inactive: Environment is up however doesn’t serve production traffic
- Decommission: Environment is no longer in use and can be removed.
- Continuous Deployment: Not in use
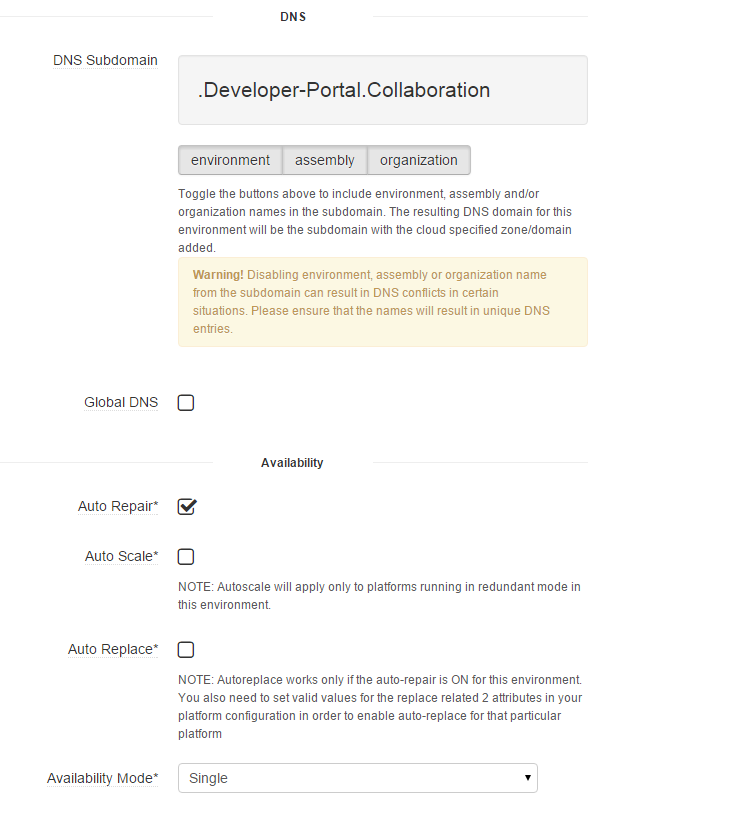
- DNS
- DNS Subdomain: Makes the environment unique
- Global DNS: If checked, creates the GLB
For a new environment, “Provision” is the correct status value. Other values should be used after the environment is created and functioning. This status value is used only for administrative purpose by NOC or OneOps admins to understand the state of the environment.
- Configure the availability.
- Availability mode:
- Single: Generates an environment without load balancers, clusters, etc.
- Redundant: Inserts and configures clusters, load balancers, rings, etc., depending on what the best practice is for each platform.
- High-Availability: Adds multi-provider or multi-region to a redundant environment. Availability can only be changed when creating the environment.

- Availability mode:
-
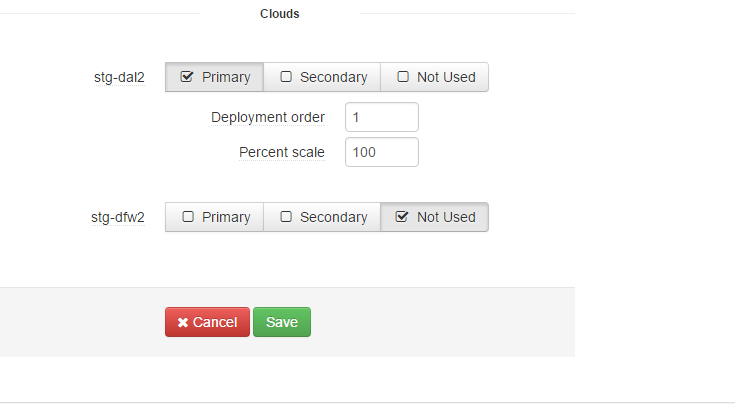
Select one or more primary and secondary clouds from the list of available options.

Debug should not be used by users. It is used to debug OpenStack issues.
-
To save the environment, click Save.
A new Environment manifest is generated and the Environment details page is shown.
- Review the changes, which are now a set of add Actions.
-
Click Commit and Deploy.
The deployment plan is generated.
- Review the deployment steps and then click Deploy.

