Home > developer > core development > Development Environment Setup
Development Environment Setup
This document contains some older notes for the development environment setup and build. Refer to the overview for building from source and running OneOps.
Environment Setup
Configure the required environment variables as per your local setup.
export OO_HOME=~/work/projects/walmart
export CASSANDRA_HOME=~/install/apache-cassandra-1.2.6/
export AMQ_HOME=~/install/apache-activemq-5.11.1
export AMQ_PLUGIN_HOME=$OO_HOME/amq-plugin
export PG_HOME=/Library/PostgreSQL/9.2
export KLOOPZDB_HOME=$OO_HOME/db-schema/db
Optionally configure these variables in a script or even in your shell startup in ~/.bash_profile or
~/.profile.
Add a number of host names for OneOps in your etc/hosts file in addition to localhost:
#Before
127.0.0.1       localhost
#After
127.0.0.1       localhost api antenna opsmq daq kloopzappdb kloopzcmsdb cmsapi sensor activitidb kloopzmq kloopzapp search searchmq opsdb activemqdb
Database Schema
Create the database schema:
- Navigate to $OO_HOME/db-schema/db
- Connect to the local postgres database via command line with -
$sudo -u postgres psql postgres - Execute the scripts
postgres=# \i single_db_schemas.sql
postgres=# /q
./install-db.sh
./install-activitidb.sh
Validate database setup by connecting to all 3 databases - user, cms and activity.
| Database    |                             Jdbc URL        |  Credentials        |
| ----------- |:-------------                               |       -----         |
| User DB     | jdbc:postgresql://127.0.0.1:5432/kloopzapp  | kloopz / kloopz     |
| CMS DB      | jdbc:postgresql://127.0.0.1:5432/kloopzdb   | kloopzcm / kloopzcm |
| Activiti DB | jdbc:postgresql://127.0.0.1:5432/activitidb | activiti / activiti |
ActiveMQ Setup
Copy the file amqplugin-1.0.0-fat.jar from ~/.m2/repository/com/oneops/amqplugin/1.0.0/ to ActiveMQ’s lib
folder.
Copy activemq.xml to the ActiveMP conf folder.
$ cd $AMQ_HOME/conf
$ curl -o activemq.xml https://raw.githubusercontent.com/oneops/amq-plugin/master/src/main/resources/conf/amq_local_kahadb.xml
Set environment variable KLOOPZ_AMQ_PASS with export KLOOPZ_AMQ_PASS=kloopzamqpass
Now start ActivemqMQ server with
$ cd $AMQ_HOME/bin
$ cd /macosx
$ ./activemq restart && tail -100f ../../data/wrapper.log
Ensure to use the OS specific folder i.e macosx or linux-x86-64 or linux-x86-32.
Once the server started successfully, check the user interface at http://localhost:8161/admin and log in with the default credentials admin/admin.
Inductor Setup
Setup the stub for inductor:
$ cd $OO_HOME/dev-tools/inductor-stub
$ mvn clean install
Prepare and install the Inductor gem:
$ cd $OO_HOME/oneops-admin
$ mkdir target
$ cp $OO_HOME/inductor/target/inductor-1.1.0.jar target/
$ gem build oneops-admin.gemspec
$ gem install oneops-admin-1.0.0.gem
This step might take 2-3 mins.
You can validate a successful install with the command inductor help. In case of any errors, it can be helpful
to provide complete permissions to rvm or rubies folder.
Create one inductor for each cloud like aws, azure, openstack, etc..
$ cd ~/install
$ inductor create
$ cd inductor
$ inductor add
Queue? /public/oneops/clouds/aws
What is the authorization key? awssecretkey
Edit cloud related information in
~/install/inductor/clouds-enabled/public.oneops.clouds.aws/conf/inductor.properties as shown below
max_consumers = 10
local_max_consumers = 10
amq.authkey = awssecretkey
amq.zone = /public/oneops/clouds:aws

# Following needs to be uncommented in case if we want to stub the cloud
#stub.clouds=dev-dfwstg2 #This is the cloud we create through OneOps display UI.
#stub.responseTimeInSeconds=1
#stubResultCode=0
Provide trustStore as JVM startup argument for proper activeMQ connection in
~/install/inductor/clouds-enabled/public.oneops.clouds.aws/conf/vmargs.
-Djavax.net.ssl.trustStore=$AMQ_HOME/conf/client.tsLink circuit-oneops-1 inside inductor.
$ cd ~/install/inductor
$ ln -s $OO_HOME/circuit-oneops-1 circuit-oneops-1
Start the inductor.
$ inductor startYou can check the status of Inductor with inductor status (or) ps –ef | grep inductor
Running the Applications on Tomcat
Start Cassandra.
$ cd $CASSANDRA_HOME/bin
$ sudo -S ./cassandra -f
You can stop Cassandra with sudo -S pgrep -f cassandra | xargs -n 1 sudo kill -9
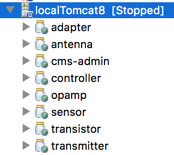
Add the following projects to Tomcat server.
Add the additional JVM arguments to Tomcat server startup parameters
-Doneops.url="http://localhost:3000" -Dcom.oneops.sensor.chdowntime=315360000 -XX:+CMSClassUnloadingEnabled -XX:+CMSPermGenSweepingEnabled -Xms512M -Xmx1024M -XX:MaxPermSize=512m -Dcom.sensor.cistates.cl=ONECreate a file with 24 byte random string in $OO_HOME:
$ cd $OO_HOME
$ dd if=/dev/random count=24 bs=1 | xxd -ps > oo.des
Add environment variables to Tomcat server.
ACTIVITI_DB_HOST=kloopzcmsdb
ACTIVITI_DB_USER=activiti
ACTIVITI_DB_PASS=activiti
AMQ_USER=superuser
API_ACESS_CONTROL=permitAll
API_SECRET=oneops@ce$$
API_USER=oneops-api
CMS_DB_HOST=kloopzcmsdb
CMS_DB_USER=kloopzcm
CMS_DB_PASS=kloopzcm
CMS_DES_PEM=$OO_HOME/oo.des
com.oneops.sensor.channel.uptimedelay=100000000000
com.sensor.cistates.cl=ONE
CONTROLLER_SEARCH_PUBLISH_POOLSIZE=20
ECV_SECRET=switch@
ECV_USER=oneops
IS_SEARCH_ENABLED=true
JAVA_OPTS=-XX:+CMSClassUnloadingEnabled -XX:+CMSPermGenSweepingEnabled -Xms512M -Xmx1024M -XX:MaxPermSize=512m
KLOOPZ_AMQ_PASS=kloopzamqpass
KLOOPZ_NOTIFY_PASS=secret
MAX_HB_SEED_EVENT_DELAY=600
NOTIFICATION_SYSTEM_USER=admin
OPAMP_SEARCH_PUBLISH_POOLSIZE=40
ORPHAN_HANDLER_DELAY=1
ORPHAN_HANDLER_INIT_DELAY=2
SEARCH_PUBLISH_ASYNC=false
SEARCHMQ_USER=superuser
SEARCHMQ_PASS=kloopzamqpass
TRANSMITTER_SEARCH_PUBLISH_POOLSIZE=30
Replace $OO_HOME value as the expression is not evaluated here. We provided default credentials. Relace those according to yours.
Create missing retry directories.
$ mkdir -p /opt/oneops/controller/antenna/retry
$ mkdir -p /opt/oneops/opamp/antenna/retry
$ mkdir -p /opt/oneops/cms-publisher/antenna/retry
$ mkdir -p /opt/oneops/transmitter/antenna/retry
$ mkdir -p /opt/oneops/transmitter/search/retry
$ mkdir -p /opt/oneops/controller/search/retry
$ mkdir -p /opt/oneops/opamp/search/retry
Start the Tomcat server. All applications should be deployed without any error in console.
Circuit Setup
Run below command to install the Circuit component after installing Inductor.
----Optional start-------------------
$ export CMS_API=http://localhost:8080
$ export CMSAPI=http://localhost:8080
$ mkdir -p  $OO_HOME/circuit-install
$ cd $OO_HOME/circuit-install
$ circuit create
$ cd circuit
$ circuit init

$ cd $OO_HOME/circuit-oneops-1
$ bundle install
$ circuit install
In case if you face any errors try bundle exec circuit create and ensure that Tomcat is running
Running OneOps
Add below environment variables to ~/.bash_profile.
export OODB_HOST=localhost
export OODB_USERNAME=********
export OODB_PASSWORD=********
Install bundler
$ cd $OO_HOME/display
$ gem install bundler
$ bundle install
Set up the database’s DDL & DML
$ cd $OO_HOME/display
$ bundle exec rake db:schema:load
$ bundle exec rake db:migrate
Start the Ruby on Rails server
$ cd $OO_HOME/display
$ rails server
If the above gives error, try with
bundle exec rails server
Now, the OneOps UI is available at http://localhost:3000
ElasticSearch
As part of development environment setup Elasticsearch is already downloaded at ~/install/elasticsearch1.7.1.
Change cluster name to oneops in ~/install/elasticsearch1.7.1/config/elasticsearch.yml
cluster.name: oneopsStart Elasticsearch and access the UI at http://localhost:9200/
$ cd ~/install/elasticsearch1.7.1/bin
$ ./elasticsearch
Setup OneOps related templates & data. Refer to README.
$ cd $OO_HOME/search/src/main/resources/es/templates
$ curl -d @./cms_template.json -X PUT http://localhost:9200/_template/cms_template
$ curl -d @./event_template.json -X PUT http://localhost:9200/_template/event_template
$ curl -d @./cost_template.json -X PUT http://localhost:9200/_template/cost_template
$ cd $OO_HOME/search
Run SearchListener
$ java -jar -Dnodes=localhost:9300 -Dindex.name=cms-all -Damq.user=system -Damq.pass=abcd -Dcluster.name=oneops target/search.jar -Dsun.net.spi.nameservice.provider.1=dns,sun -Dsun.net.spi.nameservice.provider.2=default